Luciferase in vivo imaging protocol
▍ Determining the Kinetic Curve
The kinetics of tissue biodistribution may be different for each animal model and experimental design. We recommend creating a kinetic curve for each system prior to conducting the experiment in order to determine the peak signal time for imaging the animal model after the substrate injection.
Suggested starting dose: 100μl of prepared substrates for a 20g mouse.
To generate a kinetic curve for luciferase activity in your model:
1. Inject the substrate via one of the proposed methods listed below (Intraperitoneal (IP) or Intravenous (IV)). If you need to sedate the animals before injection, be aware that it may slightly extend the kinetics(peak luciferase expression time). The biodistribution of Luc substrate may also be different depending on the route of adminitration.
2. For IP Injection
a. If you are able to inject into animals which are still awake, wait three minutes,then sedate by your method of choice (gas or injectable anesthesia).
b. Place sedated animals in imaging chamber and take the first image approximately five minutes post Luc substrate injection.
3. For IV Injection
a. Immediately sedate the animal ( if not already sedated ) by your method of choice (gas or injectable anesthesia).
b. Place sedated animals in imaging chamber and take the first image within first two minutes post substrate injection.
4. Continue to take images every 5-10 minutes up to about 40-60 minutes for IP injected models (for IV injected models: image every 1-5 minutes up to 20-30 minutes) to generate a kinetic curve for luciferase expression in your model.
Most injectable anesthesia will last 20-30 minutes and might require an additional dose for a full kinetic curve study.
5. Choose the best time point to image your model from your kinetic curve. Many models reach their peak signal time approximately 10-20 minutes post IP injection and 2-5 minutes post IV injection.
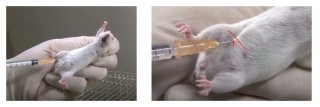
▍ Intraperitoneal Injection (IP) in mice
 in mice")
2. Draw an imaginary line across the abdomen just above the knees (see image above).
3. The needle should be inserted along this line on the animal's right side and close to the midline. (The point of entry is cranial to and slightly medial of the last nipple in a female mouse.)
4. Inserting the needle on the mouse's right side avoiding the cecum, which is a large fluid- filled organ on the left side of the abdomen. The small intestines (on the right side) are less likely to be punctured by the needle.
5. Inserting the needle too far caudally or laterally from the insertion point shown above would risk making an injection into the rear leg which would injure the muscle tissue.
6. To perform an IP injection, the mouse must be well restrained so that it cannot move during the procedure. This avoids traumatizing the organs once the needle has entered the abdomen.
7. Restrain the mouse and tilt so that the head is facing downward and its abdomen is exposed.
8. Thoroughly disinfect the injection site with 70% ethanol.
9. We recommend using a 25-27 gauge needle for IP injections. Insert the needle into the abdomen at about a 30-degree angle.
▍ Intravenous Injection (IV) in mice
 in mice")
